An easy image transfer technique on a pagoda lantern

While I am always very crafty I tend to have difficulty with the artistic side of drawing. I’ve used quite a few different hacks to trace over the years, including the one where you run soft pencil lead along the entire back of a page, so that when you turn it over, and then go over the lines, the lead transfers. This is a great thing to do in a pinch but it does, in fact, leave pencil everywhere.
Another very solid one that I have used for years is simply going over lines over and over again, with a sharpie until it bleeds through so much it leaves you an outline on what you want to draw on. However, both of these techniques make very small and find details incredibly difficult so I felt super lucky when I found the sterile transfer paper. I had used carbon transfer paper before in the past which is basically the Saral carbon version of the pencil trick. However, again, carbon gets everywhere, and especially if you’re transferring on to white, that can be very frustrating. I really love this Saral sample pack because it comes with the color of each of their transfer papers that they sell and frankly you can use them over and over so many times that I have bought two of these packs total over the past five years.

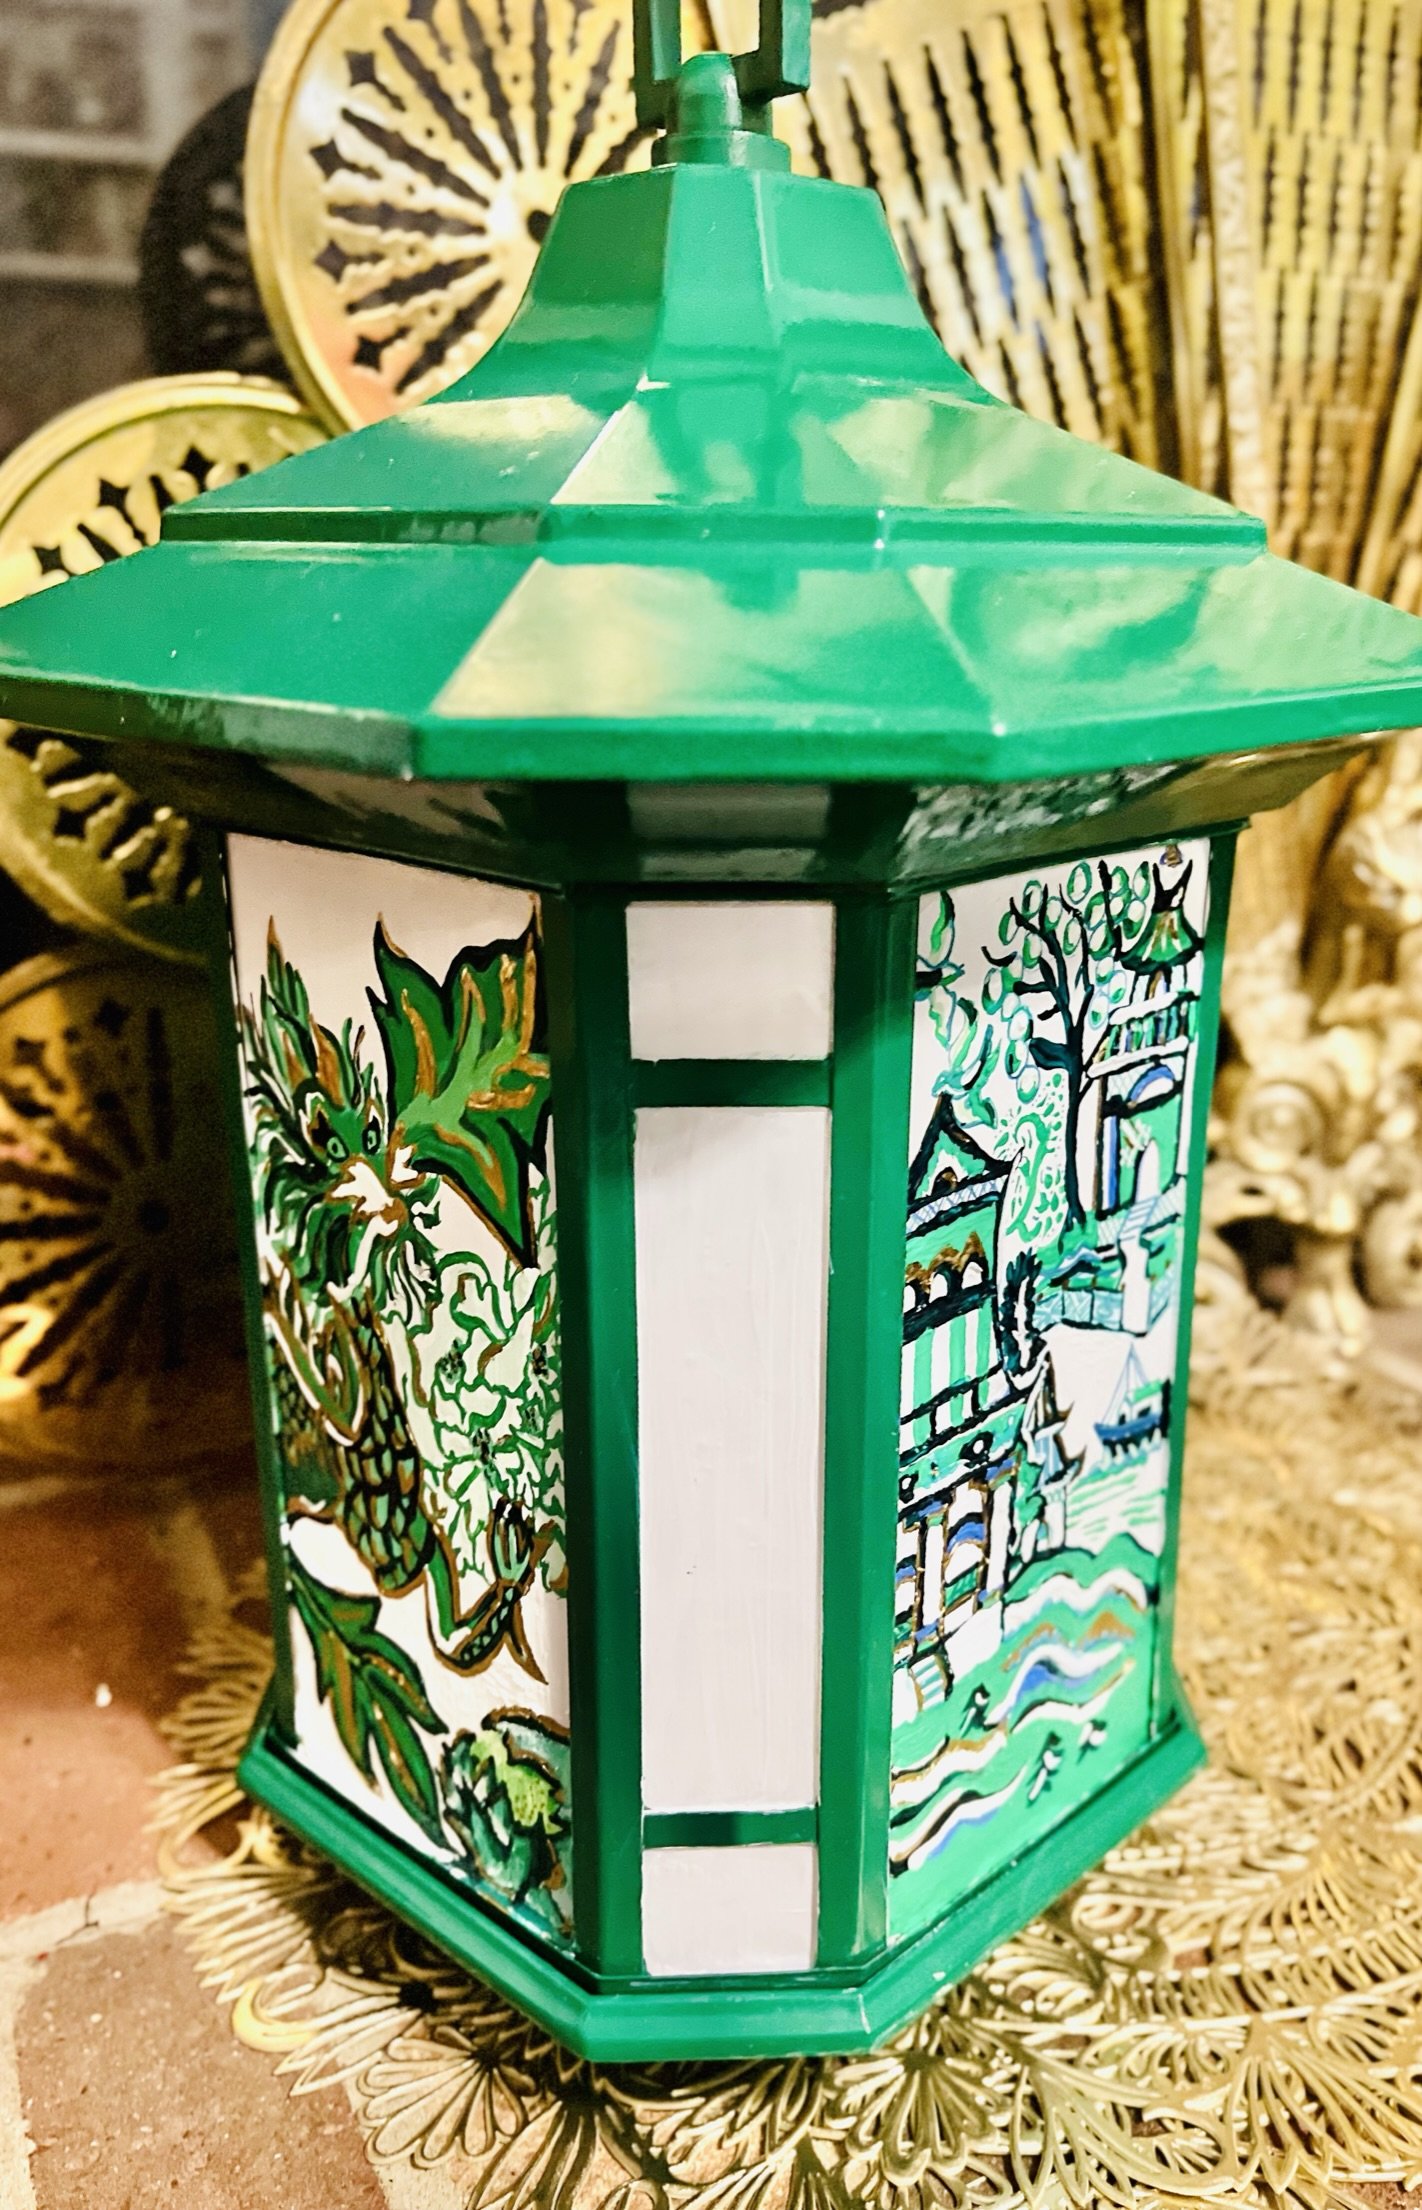
When I saw this lamp at the Goodwill, I knew immediately that I had to try and do something with it. I love the look of pagodas, but do not love the price of many pagoda objects. I’ve had my eye on a rattan one for a while that is more than $100 and even the most basic of them tends to run very high. So in the spirit of Delamping I thought well I can Delamp this bad boy and then I’ve got three sides of this pagoda to work on. There was some kind of very bizarre plastic, glassy khaki, vaguely marbled thing going on, and it didn’t really lend itself to being a great base coat. I actually wanted to pull it out and then either replace it with some wood or paint it separately to make my life easier, but when I saw that each panel was held on with approximately 47,000 tiny metal clips, I changed my tune real quick.

Even though I deeply loathe taping, I also deeply loathe trying to paint white over colors like dark green so I did take the time to go ahead and tape up not only the large areas where I plan to paint, but also the smaller windows in the corner. After taping them up, I took them out to the stump and sprayed with the Rustoleum Meadow Green Gloss (https://amzn.to/3QHmPYc) that is pretty much my standard go to. Like many weirdly shaped objects it did get a second squirt on the weird places that I had missed especially under the roof. I’ve actually gotten better about not completely letting things dry before pulling tape off because I find that it gives a crisper line if it doesn’t have a chance to completely cement itself with the dried paint. So I let this dry for probably about an hour or so, and then went ahead and pulled the tape and paper off before letting it fully dry for 24 hours.
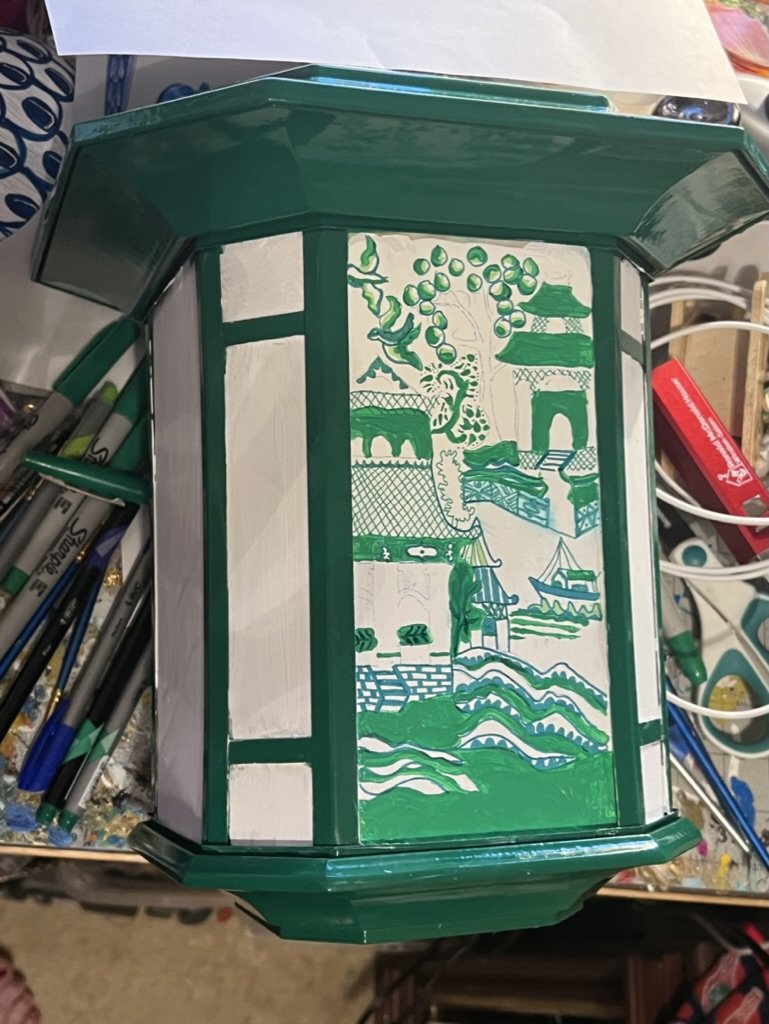
I really like using white chalk paint as a base for things these days because I find that it gives me a quicker and thicker base than just plain acrylic white does. I went ahead and did a double coat on each of the large windows and a single coat on the side bits. Honestly, they needed a third coat, but I was in the mood to start working so before I traced onto each window, I did at least go over and do a touchup on the white areas that needed a little bit more love.

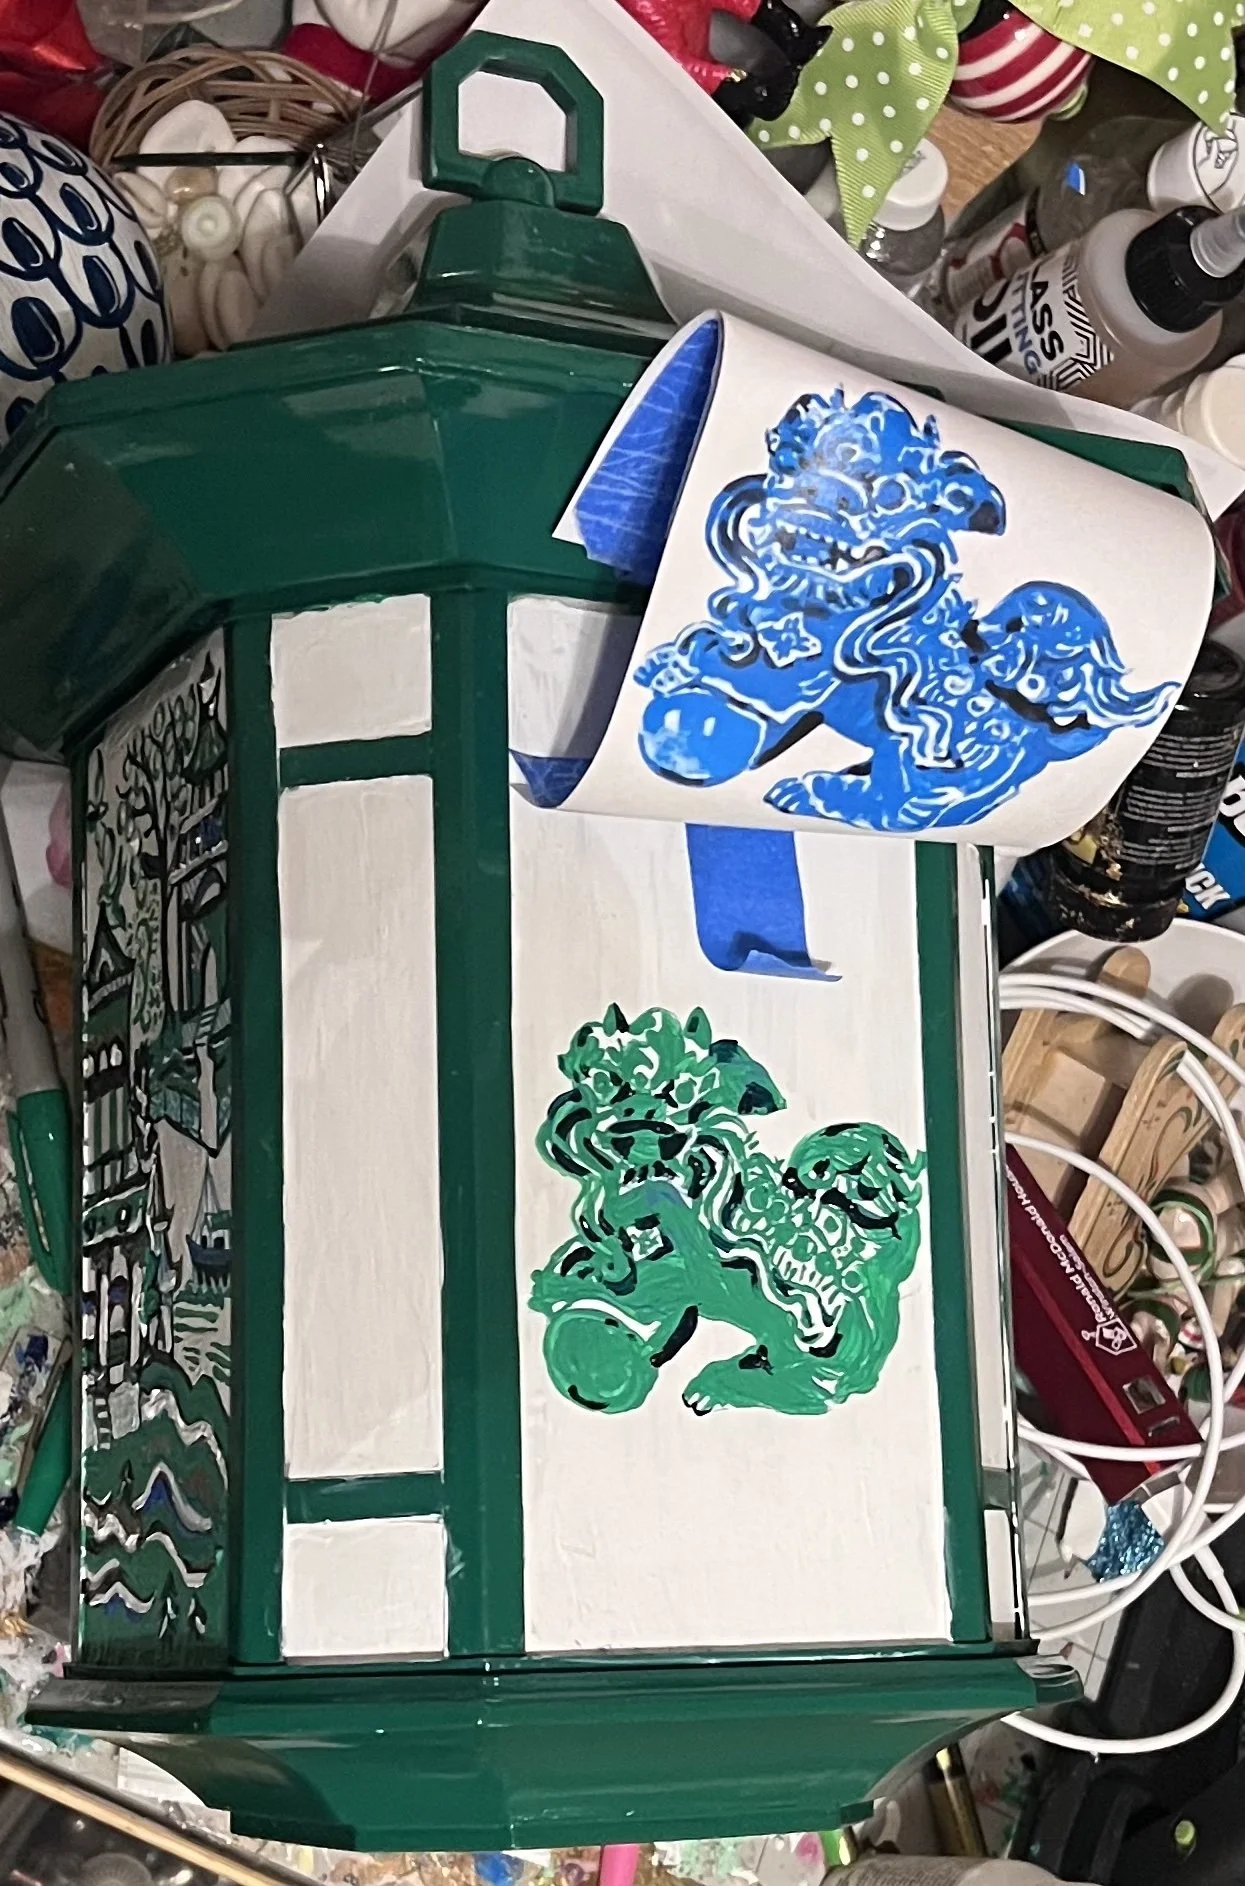
Now the beauty of tracing things that you want to paint is that you can combine as many images as you like together into your final image, or additionally, if you’re using something like text, you can combine multiple pieces of text together and then create your finished project. I happened to spend a fair bit of pandemic teaching myself how to use Photoshop so I went ahead and combined my photos in that route. However, this works perfectly fine if you find images and either copy or print them and then just tape them together in whatever format you would like. The Saral does not care. I googled chinoserie images and specifically went looking for ones that had strong lines and while I liked some detail, I tried to not get details that were so intricate that I would lose them in the painting. I ended up combining a couple of pagodas from different fabrics that I liked and also grabbing a boat out of somewhere.
So I took the images that I liked, put them into Photoshop and I created a template that was the size of each of the windows that I wanted to paint so that I could get the ratios and placement correct as I was building the design. This would also work in some thing, like Microsoft Word, or paint where you could create an object shape the size of what you want and figure out how to put it inside. Additionally you could get the same effect by creating a collage on paper - you don’t have to get fancy and digital with it.
I printed the photoshopped images off and placed them over each of the windows, trying to figure out what the best way was going to be to line them up and just physically putting it on the object to make sure it was laying out the way I wanted before I got hard-core into the tracing.


So now this is where your Saral tracing paper comes in. When I was doing white, I went ahead and traced with the blue tracing paper. I like the yellow because it leaves very little residue behind however, it can actually be difficult to see on white and I find that sometimes it’s actually better on darker colors. The red and the graphite are both fine and I’ve use them on a couple of projects, but it really just depends on what your background color is and then how much you’re going to paint, how careful you want to be, and what colors you’re going to paint over it. I absolutely suggest making a teeny tiny mark once you put your Saral paper on and then checking to see how it’s coming through to make sure that you like the way that the color is transferring. Do not do what I did and finish 3/4 of a box with Chinese characters only to realize that yellow was absolutely not going to work for that one. So while I am usually very careful about not cutting my Saral, because I like to continually reuse it, I was pretty close to the end of this sheet of blue and I thought it would make my life easier with such a small area for each window. I did, however use the same piece of Saral for each of the three windows.
When I felt like I was ready to go ahead and start transferring, I took a piece of painters’ tape and put it on the paper. I had printed of what I wanted to trace and then I took the sterile, so you are going to put the powdery side down and the slightly shiny side up because the idea is that when you’re tracing you want that powder to actually transfer over because that’s what’s going to show you the line when you’re tracing. I make sure that the tape is on both the piece of paper and the sterile, and then I taped it to the top of the lantern. I do like to keep a very small piece of tape on the bottom as well because it helps to keep both pieces from moving and shifting however, you don’t want to tape that down as hard because every once in a while it can be useful to pull that one up and peek under to make sure that your lines are transferring the way you want them to.
The other thing that’s really nice about this technique is that if you notice that the proportions that you thought were going to work, end up, not working quite right you can always physically switch it around. For example, the lanterns hanging above Foo actually were not quite right, and so I ended up tracing Foo, entirely, and then actually moving the tracing paper and the Saral down so that I could end up putting the lanterns more where I wanted to be rather than where I had printed them on the paper. Always go with your gut because it is going to be right.

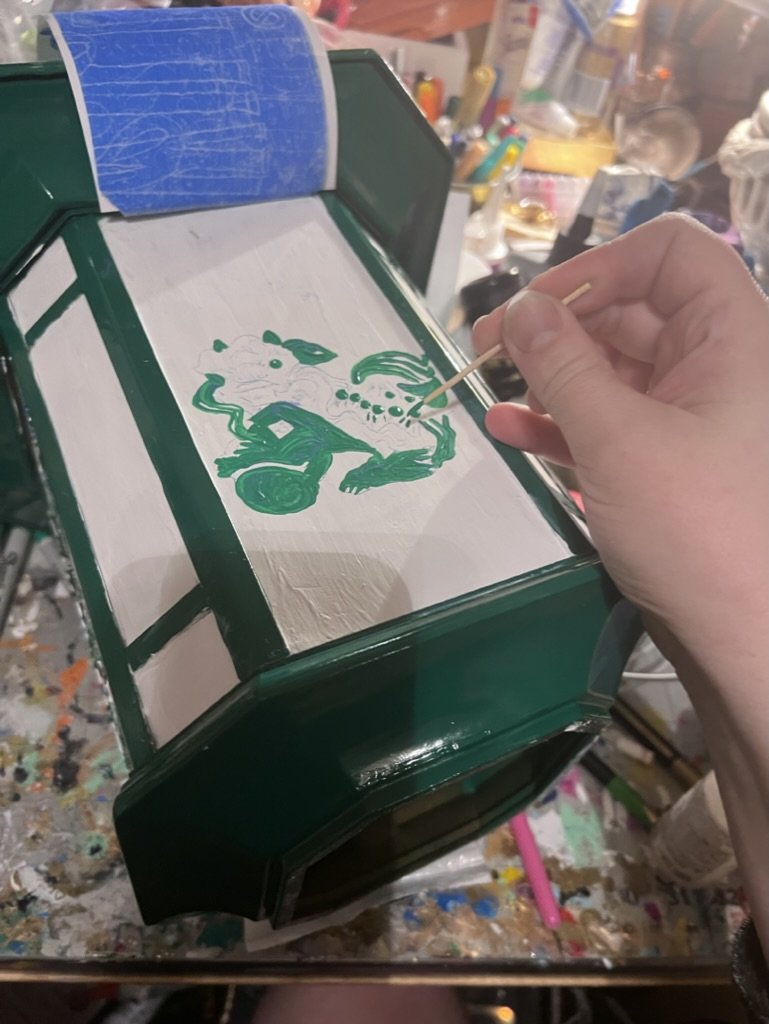
I’ve used all kinds of different instruments for the actual tracing, and it really just comes down to the size of the lines that you’re tracing. For example, if I am doing decently thick lines, I will often use the end of a chopstick, whereas if I’m going for smaller and finer details. I’ll use some thing that is a little bit smaller. I have been known to use those weird little corn holders that you stick into the edge of corn because those usually have a tiny little spike I have some metal cocktails words that I have also used in the past for this particular project I had actually found a stylus style to tool at the dollar store that was pink plastic about the size of a pencil but then had a very fine metal point on the end of it. My guess is that it was intended to help weird vinyl or something similar but it worked superbly in this instance.


Something to keep in mind as you work on your project is what colors you’re going to use and also in what order so some people like to start with the outline first, and then go back and add finer details. I actually often find that it works better for me to go ahead and do large areas of color first Then find details and outline last so that it looks cleaner but it’s really whatever your preference is. That being said, just recognize that if you have different colors that you want to use for different layers, you may have to trace something like the outline of a pagoda first painted in and then later come back and transfer over some of the smaller details. That’s part of the reason why you are taping it so that you’re able to lift it up and look at it but still put the tracing back down into the correct place. so this is really just a good time to get something nice to sit on put on some music and go to town tracing over or whatever it is that you are wanting to paint. You can carefully lift up the bottom and admire your handiwork every once in a while This is partially why you want that top piece of tape to have both the top paper and the Saral attached to it, so that those two are basically moving together. If you decide that you need to paint a large swatch of say your pagoda before you go back and add details, I highly recommend picking up that bottom piece of tape and kind of flipping the whole piece of paper up and over, but still leaving it attached while you put on the paint and then also let it dry because this way your pattern and your Saral are still going to be lined up exactly where they need to be and you’re going to save yourself the headache at having to line up and re-position everything.

Now I do love the idea of coloring things in with sharpie, or even with other types of markers. Unfortunately, some of what I was finding with the sharpie and especially with the big markers was that they were starting to run a little bit and it was making me very grouchy, but also very worried about what was going to happen if I tried to use a paint on sealant later. If you were planning on not sealing your project, I genuinely think you could ponder the sharpie route. Just be really aware that even after sharpie dries if you touch it too much or if it gets too much oil from your fingerprints or water on it, it can still smear even after it’s dry.

I often get questions about how I do detailing and there’s a couple of different answers to that so one is that you can use teeny tiny brushes, and I am talking I have brushes down to the size of where I am fairly certain there’s only one or two actual hairs on the brush itself. I like those OK but I find that I don’t have quite as much control as I would really like.
I did find a nice set of brushes on Amazon that I like for some finer detail painting I actually really like it for things like pagoda roofs or things that I kind of want to put a natural fancy little twirl on the end, because these are particularly long brushes, so that they can move and make rounded shapes really beautifully and they’ll give you a really nice flick on the end.
However, most of my really teeny tiny detailing is done with slightly more unconventional tools. When I’m trying to make a uniform, but fairly small dot, I actually like the end of a very small paintbrush, you can tip it down and pull it straight up and end up with a nice uniform small dot pretty much every time.
My best trick for bitty teeny tiny detail work is actually painting with a toothpick. I have a great little toothpick holder and I don’t know like 500 toothpicks that I got from the dollar store that I keep on my craft table and this is what I use for my very smallest detailing. This is incredibly labor-intensive. You are basically re-dipping into the paint for every eighth of an inch that you are painting, however, if you keep your acrylic paint really fresh (so you definitely don’t wanna use this technique as your paint is starting to dry and isn’t going on quite as smoothly) the trick to this is actually to get more paint then you would think that you would need on the end of the toothpick. Then you’re going to put down a tiny line of paint that can then be slightly extended until the amount of paint runs out then you can re-dip and continue on. Does it take ludacris amounts of time? Obviously. But is it the best way I know to lay down tiny lines with paint? It is.
That’s part of the reason why you are taping it so that you’re able to lift it up and look at it but still put the tracing back down into the correct place. This is a good time to get something nice to sit on, put on some music, and go to town tracing over or whatever it is that you are wanting to paint. You can carefully lift up the bottom and admire your handiwork every once in a while. If you decide that you need to paint a large swatch of say your pagoda before you go back and add details, I highly recommend picking up that bottom piece of tape and kind of flipping the whole piece of paper up and over, but still leaving it attached while you put on the paint and then also let it dry because this way your pattern and your Saral are still going to be lined up exactly where they need to be and you’re going to save yourself the headache at having to line up and re-position everything. This gets particularly important, when you are doing things with very intricate designs like the dragon scales where you want to make sure that they are lining up and in the right place. When you’re ready to be finished with tracing completely, you can take off your paper and Saral I actually like to put it pretty much right next to where I’m working because I still like to reference it while I paint to make sure that I’m getting lines, shading, and colors correct.
As far as the gold accents, I dearly and desperately love the gold out of this particular paint pan, and the fact that it has the very smallest point I’ve ever found on any paint pen. I have never had one of these paint pens continue to actually work as a paint pen for longer than approximately 12 to 15 inches of writing. However, I love the color and the thickness of the line that I can lay down with this thing so much I have developed a workaround. Basically what I do is once it stops working reliably as a paint pan. I shake it and then push the tip down either onto a paint palette or something else until I get a really nice blob of gold paint and then using a similar technique to with the toothpick dip continuously into that gold and use it to paint in that way. Again, very time-consuming giant pain in the butt but also you’ll never see another gold quite like it.

I actually have not sealed this yet I am strongly leaning towards a spray on urethane and very lightly taping around the white areas, but not actually pushing the tape all the way down, just leaving it kind of flapping a little bit and enough to protect the green when I give each big window, one quick squirt of urethane. I typically really like to use a brush on Duraclear however, I’m nervous that with some of those big markers and sharpie, that if I start doing a brush on urethane, I may end up with some marker colors running.
And really and truly that’s the entire technique. You can use it with many things you can try and do photographs you can do images that you find. I do find that images that are clear and simple tend to transfer for a little bit better and additionally are a little bit easier to paint in. However, this technique would definitely also work with coloring or also watercolor. However, I would definitely go over your Saral lines with some thing that is not going to run with the watercolor or understand that the water color is likely to take out some of your Saral lines so use very very fine tip brushes.
And now…gratuitous pictures of a veeerrryyy sexy lantern.